Krafty Chicks Challenge #706

Krafty Chicks Challenge #706 Stamps — Leanne
I have the honor of being the Guest Chick for Krafty Chicks Challenge for the month of March.
Since this is the first week of the month it means the challenge for this week is STAMP. There must be something on your project that is stamped, The main Chicks, say it can be a stamped image, sentiment or digi. It will qualify for the challenge.

The card I am sharing today is a new Stampin’ Up! Online Exclusive item, Magnolia Mood stamp set and Dies. I also used Stampin’ Up! Thoughtful Expressions Dies, and Timeworn Type 3 D Embossing Folder.

This card is an easy Fun Fold card. All the card cuts are at the end of this post. Two pieces of Bubble Bath cardstock are cut and embossed using Stampin’ Up! Timeworn Type 3 D Embossing Folder. The two embossed panel are matted on Basic Black mats and adhered to the card base using Multipurpose Liquid Glue. Two labels are die cut using dies from Stampin’ Up! Thoughtful Expressions Dies, one in Basic White, the other in Basic Black. The large magnolia image from Stampin’ Up! Magnolia Mood stamp set is stamped in Smoky Slate ink on a piece of Basic White cardstock. The image is colored using Bubble Bath, Granny Apple Green, and Wild Wheat Stampin’ Blends. The magnolia image is die cut using the matching die from Stampin’ Up! Magnolia Mood Dies. The image is then popped over the two label on the card front. Gems from Tinsel Gems Four Pack are popped around the card front.

Two labels are die cut from Bubble Bath cardstock using a die from Stampin’ Up! Thoughtful Expressions Dies. A sentiment from Stampin’ Up! Beach Day stamp set is stamped in Memento Black ink for the inside left panel. A magnolia is stamped in Versa Mark ink under the sentiment. A Basic Black label is die cut from the same dies to create a mat for the sentiment on this panel. A sentiment from Stampin’ Up! Wild Ferns stamp set is stamped in Memento Black ink on the other label it is adhered to the right side panel after small magnolias are stamped in Versa Mark on the panel.

A Basic White envelope gets a Magnolia from Stampin’ Up! Magnolia Mood stamp set stamped on the envelope flap and the envelope left corner on the front using Bubble Bath ink.
Thank you for stopping by today. I hope you took the time to linger and look at my other blog post and cards and that you will join me on my stamping journey as I share my cards with you each day. My hope and wish are that you will be inspired to create amazing creations yourself. Feel free to CAS(E) any card. Any questions you may have, you know you can always contact me. Have a blessed day!
This is the challenge I am entering this card. Make My Monday Challenge — their theme for this challenge is Fun Fold and I have a Fun Fold card.
Questions? You can Contact Me. I’d love to be your Demonstrator if you need any stamping supplies. Just click on the Shop Now button on the top right side of the screen to go directly to my online store. You can Shop in my online store HERE.
- Ready to Join our team? Click HERE for more information. One of the perks of being a demonstrator is that you get to pre-order before a new catalog launches so you are able to show your customers what they can look forward to having when the new catalog comes out. You will also be getting at least a 20% discount on purchases. If you love card making as a hobby, you can still be a demonstrator and get that discount to help get more card making items, or you can be like I was and buy Stampin’ Up! products for 10 years before I became wise enough to become a demonstrator to get the discount. When I think of all the stamping products that 20% would have brought over those 10 years, I cringe.
- Want to earn FREE Stampin’ Up! products through the Customer rewards program? The rewards program is my way of saying thank you for being an online customer. Click HERE to learn more.
- Check out Paper Pumpkin you will love it!
March 1-31 Host Code – C44U26SD
Use this host code when you order $50 or greater and receive a free gift from me! If your order is over $150, please do not use this code, but you’ll still get the free gift. The free gift is your choice of any item valued up to $10.00 in any active Catalog.
Memorable Meadows
Subscribe February 11 – March 10
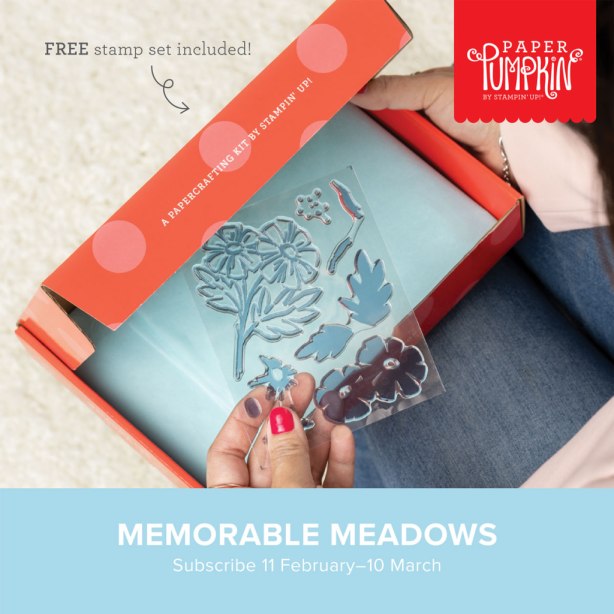
Share nature’s beauty with lovely all-occasion cards!
• Makes 9 cards: 3 each of 3 designs with 9 coordinating envelopes
• Precut vellum pieces & wood embellishments
• Coordinates with the Meandering Meadows Suite Collection (item 162745)
• Coordinating colors: Granny Apple Green, Garden Green (Classic Stampin’ Spot),
Balmy Blue, Night of Navy, Gorgeous Grape, Fresh Freesia
Don’t miss the coordinating Love of Spring Dies add-on!
The dies will coordinate with the January, February and March Paper Pumpkin Kit.
The Love of Spring Dies Add-On—available only while supplies last!

Item # 164396 $12.00
Stampin’ Up! Products Used In Creating This Card
|
|
|
|||
|
|
|
|
|
|
|
|
||||
|
|
")

")
")

")


Card Cuts
- Pebble Path cardstock
- card base — 4-14″ x 8-1/2″ scored at 3″
- mat for art piece — 2-1/2″ x 3-3/4″
- Calypso Coral cardstock
- mat on left panel card front — 2-3/4″ x 4″
- mat art piece — 2-1/4″ x 3-1/2″
- right inside panel — 4″ x 5-1/4″
- Softly Stippled Designer Series Paper
- card front left panel — 2-1/2″ x 3-1/2″
- left side front — 2-1/2″ x 3-3/4″
- background art piece — 2-1/4″ x 3-1/2″
- back side of art piece — 1-1/2″ 3-1/2″
- Basic White cardstock
- greeting & sentiment labels — (3) 3″ x 4-1/2″
- card back — 4″ x 5-1/4″


")


")
 Designer Series Paper")


")
")

 Designer Series Paper")

 Faux Leather Trim")


")
 Designer Series Paper")


