Browsed by
Category: I Miss You

Stampin’ Up! Irresistible Blooms

Stampin’ Up! Irresistible Blooms

The card I am sharing with you today is created using Stampin’ Up! Irresistible Blooms stamp set, Stripes & Splatters 3D Embossing Folder, and Awash in Beauty Designer Series Paper.  This is a CAS of Lisa Curcio’s fun fold card.  I would suggest watching Lisa’s YouTube video for great instructions.

I am entering Four Seasons Challenge — This is the time of year for their challenge to be Spring Anything Goes.

I am also entering Pammie’s Inkie Pinkies Challenge.

I am also entering the Tic Tac Toe Challenge.  I am choosing the middle row down.

I stamped the flowers on a piece of Shimmery White card stock using Merry Merlot ink, then Versa Mark and Clear Embossing Powder.  I heat embossed using a heat tool.  I then fussy cut the flowers and colored using Merry Merlot ink.  There are flowers here and inside the card.  The leaves are stamped in Pear Pizzazz ink (soon to be retired). I die-cut a heart from Basic White card stock, embossing using the Splatters die from Stripes and Splatters 3-D Embossing Folders.  I put Stampin’ Seal on the back of the heart and wrapped the scalloped piece of Merry Merlot around the heart.  Oh! yes, it was such fun trying to do that so it would not crinkle up. Iridescent Rhinestone Jewels are popped around the card front.

My card base is Merry Merlot card stock (soon to be retired).  I am giving the card cuts here instead of at the end of the post so you will know what to cut to make it easier.  If you want mats for the Designer Series Paper cut the Designer Series Paper 1/8″ smaller than the dimensions I give to be able to cut a mat. 

  • Card Base — 5-1/2″ x 11″   score at 4″ & 8-1/16″ that’s correct 1/16.  It is the first mark  8″.
    • Designer Series Paper left side front — 2-3/4″ x 5-3/8″
    • Designer Series Paper inside middle — 3-3/4″ x 5-1/4″
  • Card — 4-1/2″ x 7″  score at 3-1/2″
    • Designer Series Paper — 3-3/8″ x 4-3/8″
    • Inside Panel for sentiment — 2-5/8″ x 3-3/4″
  • Panel for Pocket
    • Merry Merlot card stock — 3-3/8″ x 4-7/8″
    • Designer Series Paper — 3-1/4″ x 4-3/4″

Adhere a piece of Awash in Beauty Designer Series Paper to the outside left.  This panel will be folded in.

The card base is 5-1/2″ x 11″ scored at 4″ and 8-1/16″, once scored turn the card base around so the narrow panel is on the left.  This is the panel above that you adhered Awash in Beauty Designer Series Paper.  Fold the right side panel in and put glue on the outside edge and along the bottom. Fold this panel in adhering to the middle panel.  You can see the Awash in Beauty Designer Series Paper behind the small card that is adhered after you adhere to the middle panel. After adhering the Awash in Beauty Designer Series Paper, adhere the small Merry Merlot card stock card using Multipurpose Liquid Glue.

A piece of Merry Merlot is cut and a piece of Awash in Beauty is adhered to it using Multipurpose Liquid Glue.  One of the flowers is adhered to the corner of the piece.  This is the insert for the pocket. You can use to adhere a gift card or even write a note as this is what this one will be.

Basic White medium envelope gets a piece of Awash in Beauty Designer Series Paper adhered to the envelope flap. 

Thank you for stopping by today. I hope you took the time to linger and look at my other blog post and cards and that you will join me on my stamping journey as I share my cards with you each day. My hope and wish are that you will be inspired to create amazing creations yourself. Feel free to CAS(E) any card. Any questions you may have, you know you can always contact me. Have a blessed day!


Questions? You can Contact Me.  I’d love to be your Demonstrator if you need any stamping supplies.  Just click on the Shop Now button on the top right side of the screen to go directly to my online store.  You can Shop in my online store HERE

  • Ready to Join our team?  Click HERE  for more information. 
  • Want to earn FREE Stampin’ Up! products through the Customer rewards program?  The rewards program is my way of saying thank you for being an online customer.   Click HERE to learn more       
  • Check out Paper Pumpkin you will love it!  

April 15-30 Host Code: VB7V429M

 Use this host code when you order $50  or greater and receive a free gift from me!  If your order is over $150, please do not use this code, but you’ll still get the free gift.  The free gift is your choice of any item valued up to $10.00 in any active Catalog.


Say hello to mountain landscapes and new In Colors! This month’s kit features nine outdoors-themed cards in our new 2023–2025 In Colors plus exclusive FREE stickers.  We all love FREE! Want more? Get the cards & envelopes add-on (available 2 May while supplies last) and continue your creative adventure!

ABOUT THE KIT

Name: Exploring In Color

This kit includes:

  • All the supplies you need to create 9 card, 3 each of 3 designs, plus 9 coordinating envelopes.
  • A 7-piece all-occasion stamp set that celebrates good friends and great adventures!
  • 1 Copper Clay (new In Color!) Classic Stampin’ Spot.
  • Twine and die-cut accents
  • FREE stickers to put on your projects or anything you want—water bottles, laptops, coolers, and more!
  • Finished card size: 4-1/4″ x 5-1/2″ (10.8 x 14 cm).
  • Coordinating Stampin’ Up! colors: Boho Blue, Copper Clay, Daffodil Delight, Moody Mauve, Mossy Meadow, Pebbled Path, Wild Wheat

ADD-ON

Exploring In Color Cards & Envelopes

Available starting: 2 May, while supplies last

Price: $10.00 USD | $13.75 CAD

This add-on includes

  • 18 cards, 6 each of 3 designs
  • 18 coordinating envelopes
  • Finished card size: 4-1/4″ x 5-1/2″ (10.8 x 14 cm)

Coordinating Stampin’ Up! colors: Boho Blue, Copper Clay, Daffodil Delight, Moody Mauve, Mossy Meadow, Pebbled Path, Wild Wheat


Stampin’ Up! Products Used in Creating This Card


Let’s Connect

https://campsite.bio/https://stampinwithshirleyg.com

Stampin’ Up! Adorable Owls

Stampin’ Up! Adorable Owls

The card I am sharing today is created using a FREE Sale-A-Bration item.  These  Stampin’ Up! Adorable Owls are yours for free with a $50 order.  We all like free.  I also used Happy Forest Friends Designer Series Paper.  

I am entering the Creative Creases Challenge as my card can be considered a fun fold.

My card is a CAS of a fun fold Tami White created.  My card base is Mossy Meadow card stock.  Cut a piece of Happy Forest Friends Designer Series Paper and adhered to the card base front using Multipurpose Liquid Glue.

After applying the Designer Series Paper crop the opening in the card as you see above.  You can use any die of your choice for the opening.  Save the piece you crop out.  I used mine as the insert for the owl.

To create the Z-fold insert  cup a piece of Mossy Meadow 6″ x 4-1/2″ scoring at 2″ and 4″.  Before scoring adhere a 4″ x 5-3/4″  panel of Happy Forest Friends Designer Series Paper, then score.  Using Tear and Tape on the right-side panel adhered the panel to the card base.  A panel of Happy Forest Friends Designer Series Paper is also applied to the inside of the card, then the Z-fold panel is adhered over it to the card base.

Stamp one of the owl images from Stampin’ Up! Adorable Owls in Memento Black ink on a piece of Basic White card stock.  Color the image using Stampin’ Blends Markers or your favorite coloring products. I used Bronze, Crumb Cake, Balmy Blue, Petal Pink and So Saffron Stampin’ Blends Markers.  Fussy cut the owl.t

I adhered the owl using Stampin’ Dimensionals to the piece I had cropped from the card front. I then popped the piece on the Z-fold using Stampin’ Dimensionals also.  Be sure to only put dimensionals on the part of the insert that will be adhered to the Z-fold.
Cut a piece of Basic White card stock 3″ x 3-1/2 and score at 1-1/2″ on the 3″ side.  This is for your sentiment.  My sentiment is from Stampin’ Up! Through This Together stamp set and is stamped in Mossy Meadow ink.

Basic White medium envelopes get a panel of  Happy Forest Friends Designer Series Paper added to the envelope flap.

Thank you for stopping by today. I hope you took the time to linger and look at my other blog post and cards and that you will join me on my stamping journey as I share my cards with you each day. My hope and wish are that you will be inspired to create amazing creations yourself. Feel free to CAS(E) any card. Any questions you may have, you know you can always contact me. Have a blessed day!


Questions? You can Contact Me.  If you need any stamping supplies, I’d love to be your Demonstrator.  Just click on the Shop Now button on the top right side of the screen to go directly to my online store.  You can Shop in my online store HERE

  • Ready to Join our team?  Click HERE  for more information. 
  • Want to earn FREE Stampin’ Up! products through the Customer rewards program?  The rewards program is my way of saying thank you for being an online customer.   Click HERE to learn more       
  • Check out Paper Pumpkin you will love it!

January 1-15 Host Code: XB3ECC6D

 Use this host code when you order $50  or greater and receive a free gift from me!  If your order is over $150, please do not use this code, but you’ll still get the free gift.  The free gift is your choice of any item valued up to $10.00 in any active Catalog.


Stampin’ Up! Products Used in Creating This Card

 Card Cuts

  • Mossy Meadow card stock
    • card base — 5-1/2″ x 8-1/2″ scored at 4-1/4″
    • z-fold card — 4-1/2″ x 6″  scored at 2″& 4″
  • Basic White card stock
    • inside panel for sentiment — 3″ x 3-1/2″ scored at 1-1/2″ on 3″ side
  • Happy Forest Friends Designer Series Paper
    • background & inside pieces — 4″ x 5-1/4″
    • background on Z-fold — 4-1/4″ x 5-3/4″


Let’s Connect

https://campsite.bio/stampinwithshirleyg

Stampin’ Up! Pretty Birds

Stampin’ Up! Pretty Birds

The card I am sharing today is created using Stampin’ Up! Pretty Birds Stamp Set and Birdhouse Dies.  This is a beautiful card.  My card is a CAS of one of my team members Karen Hickam Ilsley

It took me all day to figure out how to create it but I finally was happy on the fourth try of what I created.  There are a few things Karen has that I did not even notice until I looked at her card again when I started to post this.

My card base is Basic White card stock and Awash in Beauty Designer Series Paper as the background.  The bird cages are Coastal Cabana card stock.  I used Silver Foil to crop the bird swings, also I used the negative portion of the bird swing as the mirror.  I used a piece of window sheet to adhere the bird cages too.  Flowers from Awash in Beauty Designer Series Paper are fussy cut and adhered to the card front.  One of the birds is popped over one bunch of flowers.

The birds are colored using Parakeet Party, Tahitian Tide,Crumb Cake, Pale Papaya,and Fresh Freesa Stampin’ Blends Markers. The birds are then cropped and popped on the card front.

I am entering the Tic, Tac Toe Challenge.  I choose Leaves, Fun Fold, and Ink Blending.


This is how the card looks when folded.  This is one of those cards you make for your own pleasure, not give to someone.  I am sure any person receiving it would consider it a real treasure.  I, also, did not put a greeting or sentiment on the card as it isn’t going to anyone.

I prepared no envelope with Designer Series Paper as this card will not be given to anyone.

Thank you for stopping by today. I hope you took the time to linger and look at my other blog post and cards and that you will join me on my stamping journey as I share my cards with you each day. My hope and wish are that you will be inspired to create amazing creations yourself. Feel free to CAS(E) any card.  Any questions you may have, you know you can always contact me. Have a blessed day!


Questions? You can Contact Me.  If you need any stamping supplies, I’d love to be your Demonstrator.  Just click on the Shop Now button on the top right side of the screen to go directly to my online store.  You can Shop in my online store HERE

  • Ready to Join our team?  Click HERE  for more information. 
  • Want to earn FREE Stampin’ Up! products through the Customer rewards program?  The rewards program is my way of saying thank you for being an online customer.   Click HERE to learn more       
  • Check out Paper Pumpkin you will love it!

September 16-30 Host Code: 4XXJBYRK

Use this host code when you order $50  or greater and receive a free gift from me!  If your order is over $150, please do not use this code, but you’ll still get the free gift.  The free gift is your choice of any item valued up to $10.00 in any active Catalog!


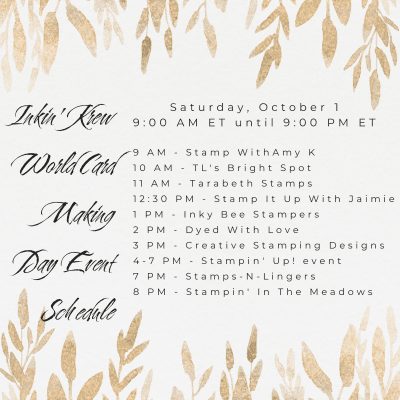
Our team is hosting an event this Saturday, October 1 for World Card Making Day!  Stampin’ Up! is also hosting a 3 hours card making event on Saturday afternoon!  Come join us for both events and make some cards to celebrate the day!

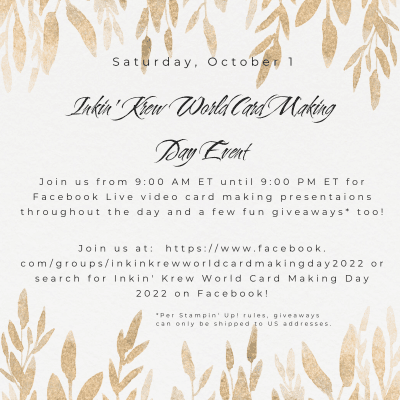
INKIN’ KREW WORLD CARD MAKING DAY EVENT – 9 AM ET UNTIL 9 PM ET, SATURDAY, OCTOBER 1!

We’re doing it again!!  Our team will be hosting a fun all-day event on Saturday, October 1 for World Card Making Day!  Our event will feature card making presentations live on the event Facebook page as well as some fun giveaways!

Hop over to our event page now and request to join so that you don’t miss out on any of the fun!  You can find the page right here:

https://www.facebook.com/groups/inkinkrewworldcardmakingday2022

Stampin’ Up! is also hosting an event online (see the details below) and we’re scheduling our event so that it runs before and after the Stampin’ Up! event!  Most of us will be using one of the three bundles from the Stampin’ Up! event for our projects so you will come away from the day with tons of ideas for those three bundles!

If you’re interested, here is our schedule of live card-making presentations:

All are welcome to join us!  No registration required for our group, just request to join the Facebook page here!  Can’t wait to stamp with you all over on the Facebook page!!

STAMPIN’ UP! WORLD CARD MAKING DAY EVENT – 2 PM MT UNTIL 5 PM MT (4 PM ET UNTIL 7 PM ET), SATURDAY, OCTOBER 1!

FREE VIRTUAL, CRAFT-ALONG EVENT WITH STAMPIN’ UP!

Stampin’ Up! is also hosting a free, virtual card making event on October 1!  In just under three hours, Stampin’ Up will make three unique cards and will share the instructions with you.  Everyone is invited and welcome, and registration is not required.  Mark your calendars now!

STAMPIN’ UP! WORLD CARD MAKING DAY CRAFTING EVENT DETAILS

Who: Anyone!
When: October 1 from 2:00–5:00 p.m. (MT)
Where: Online
Price of Event: Free
Registration Dates*: August 11 – October 1 (Registration is not required)

*You can still participate in the event without registering. Registration is encouraged because it’s the best way to stay up to date regarding event details.

Click here to register for the 3 hour Stampin’ Up! event.

To make the most of this experience, you can order the Cottage Rose Bundle from the 2022–2023 Annual Catalog, the Cottage Wreaths Bundle from the July–December 2022 Mini Catalog, or the Warm Welcome Bundle which you can get early from the January–June 2023 Mini Catalog!!  The bundles aren’t required to attend the event, but if you’d like to make the projects presented, you’ll want to get the bundles!


Stampin’ Up! Products Used in Creating This Card


Let’s Connect:

https://campsite.bio/stampinwithshirleyg


Stampin’ Up! Floral Heart with Eden’s Garden

Stampin’ Up! Floral Heart with Eden’s Garden

I used the Stampin’ Up! Eden’s Garden stamp set and Floral Dies to create the card I am sharing today.  Have you ever found that sometimes the simplest card can cause the most difficulties?I am entering the Inspire Create Challenge for this card.  I love creating cards with layers that are not straight.

I am also entering the Pinspirational Challenge. The challenge is to use the quote as inspiration or to use the colors in the picture, totally our choice!!

My card base is Pool Party. I cut a panel of Rich Razzleberry for the mat for my panel Sweet Talk DSP.  I adhered this to the card base at an angle.

Using a Bermuda Bay leftover panel from the August 2021 Paper Pumpkin, I added it over the already angled panel on the card front.  I angled it in the opposite direction.  You can use Bermuda Bay card stock for this panel or color a panel of Basic White card stock with Bermuda Bay ink and spray water over it to get the droplet effect.

I cropped the heart from a panel of Basic White card stock using the large heart die from the Floral Heart Dies.  I popped this over the Bermuda Bay panel using Mini Stampin’ Dimensionals.  The greeting is from the Stampin’ Up! Eden’s Garden stamp set, stamped in Tuxedo Memento Black ink and popped inside the heart using Mini Stampin’ Dimensionals.  Iridescent Rhinestone Basic Jewels are scattered around the card front.

For the inside of the card, I angled the panels the way the card front is angled.  I added little hearts down the side coloring each one in a color of the Pinspirational Challenge.

A medium Basic White envelope gets a panel of Sweet Talk DSP applied to the envelope flap.

If you would like to create this card all the products used are in the post instead of at the end of the post as they usually are.

Thank you for stopping by today. I hope you took the time to linger and look at my other blog post and cards and that you will join me on my stamping journey as I share my cards with you each day.  My hope and wish are that you will be inspired to create amazing creations yourself. Feel free to CAS(E) any card. Any questions you may have, you know you can always contact me.  Have a blessed day!


Questions? You can Contact Me.  If you need any stamping supplies, I’d love to be your Demonstrator.  Just click on the Shop Now button on the top right side of the screen to go directly to my online store.  You can Shop in my online store HERE

  • Ready to Join our team?  Click HERE  for more information. 
  • Want to earn FREE Stampin’ Up! products through the Customer rewards program?  The rewards program is my way of saying thank you for being an online customer.   Click HERE to learn more       
  • Check out Paper Pumpkin you will love it!

April 1-15 Host Code: SRUEXUVQ

Use this host code when you order $50  or greater and receive a free gift from me!  If your order is over $150, please do not use this code, but you’ll still get the free gift.  The free gift is your choice of any item valued up to $10.00 in any active Catalog!


Paper Pumpkin

WHAT IS PAPER PUMPKIN?

Paper Pumpkin is Stampin’ Up!’s monthly One-Stop Box™ that offers a unique variety of paper projects for subscribers of any skill level to enjoy! These thoughtfully themed and all-inclusive craft kits encourage you to explore your creativity, try new techniques, and discover your potential in paper crafting.

Create magic with the NEW 2022–2024 In Colors with this Paper Pumpkin kit! With vivid pops of green and red and a range of blues, these colors are perfect for fun festivities. Send your best wishes or happy moments with the large bold lettering and gorgeous gold foil details. Plus, you can also send gift cards with the included coordinating gift card holders!

As an added bonus, every May Paper Pumpkin subscriber will get the chance to win a GOLDEN Voucher worth $25 USD in Stampin’ Up! products!  The voucher will be randomly added to 200 Paper Pumpkin boxes.                      

ABOUT THE KIT

Name: Celebrating In Color

This kit includes:

  • Celebrating In Color Photopolymer Stamp Set
  • Basic Gray Classic Stampin’ Spot®
  • Printed card bases
  • Printed In Color envelopes
  • Printed In Color gift card holders
  • Foiled die cuts
  • Printed die cuts
  • Adhesive-backed In Color embellishments
  • Tear & Tape Adhesive
  • dimensionals

Card size: 4-1/4″ x 5-1/2″ (10.8 x 14 cm)

Coordinating Stampin’ Up! colors: Orchid Oasis, Parakeet Party, Starry Sky, Sweet Sorbet, Tahitian Tide

You can subscribe to Paper Pumpkin by clicking here


Stampin’ Up! Products Use in Creating This Card

 Card Cuts

  • Pool Party card stock
  • card base — 4-1/4″ x 11″ scored at 5-1/2″
  • Rich Razzelberry card stock
  • mat for Sweet Talk DSP — 4″ x 5-1/8″
  • Sweet Talk DSP
  • angled panel — 3-7/8″ x 5″ (cut 2)
  • Bermuda Bay card stock
  • angled panel — 3-7/8″ x 5″ (cut 2)
  • Basic White card stock
  • heart — 4-1/4″ x 5-1/2″
  • inside panel — 2-7/8″ x 3-7/8″


Stampin’ Up! Flowering Tulips A Little Note

Stampin’ Up! Flowering Tulips A Little Note

The card I am sharing today is created using Stampin’ Up! Flowering Tullip stamp set.  I also use a die from the Ornate Frame Dies, the Timeworn Type 3D Embossing Folder,  and Flowering Tulips DSP.

My challenge for the day is the Krafty Chicks Challenge.

My card base is Basic White card stock.  I embossed a panel of Poppy Parade card stock using the Timeworn Type 3D Embossing Folder adhering it to the card base.

A strip of Flowering Fields DSP is cut and adhered down the left side over the embossed panel. A piece of Basic White card stock is cropped using a die from the Ornate Frame Dies. It is adhered over the Flowering Fields DSP.

On a piece of Basic White card stock tulip images from the Stampin’ Up! Flowering Tulip stamp set is stamped in Poppy Parade, Blushing Bride, Flirty Flamingo, Old Olive, and Early Espresso ink.  As each flower was stamped, I stamped Versa Mark over the image, sprinkled Clear Embossing Powder over the image, and heat embossed.  I did this to give the tulips a bit of a shine, you can see it in some of the pictures.  This piece is matted on Old Olive card stock and popped over the Ornate Frame panel with Mini Stampin’ Dimensionals.  Crumb Cake twine from the Baker’s Twine Essential Pack is wrapped around the panel before it is adhered.  A tiny tag from the Tailor Made Tags is stamped with a greeting and tied with the end of the twine and a Mini Stampin’ Dimensional is used to pop the tag up.

A medium Basic White envelope gets a panel of Flowering Fields DSP applied to the envelope flap.

If you would like to create this card all the products used are in the post instead of at the end of the post as they usually are.

Thank you for stopping by today. I hope you took the time to linger and look at my other blog post and cards and that you will join me on my stamping journey as I share my cards with you each day.  My hope and wish are that you will be inspired to create amazing creations yourself. Feel free to CAS(E) any card. Any questions you may have, you know you can always contact me.  Have a blessed day!


Questions? You can Contact Me.  If you need any stamping supplies, I’d love to be your Demonstrator.  Just click on the Shop Now button on the top right side of the screen to go directly to my online store.  You can Shop in my online store HERE

  • Ready to Join our team?  Click HERE  for more information. 
  • Want to earn FREE Stampin’ Up! products through the Customer rewards program?  The rewards program is my way of saying thank you for being an online customer.   Click HERE to learn more       
  • Check out Paper Pumpkin you will love it!

April 1-15 Host Code: SRUEXUVQ

Use this host code when you order $50  or greater and receive a free gift from me!  If your order is over $150, please do not use this code, but you’ll still get the free gift.  The free gift is your choice of any item valued up to $10.00 in any active Catalog!


Paper Pumpkin

WHAT IS PAPER PUMPKIN?

Paper Pumpkin is Stampin’ Up!’s monthly One-Stop Box™ that offers a unique variety of paper projects for subscribers of any skill level to enjoy! These thoughtfully-themed and all-inclusive craft kits encourage you to explore your creativity, try new techniques, and discover your potential in paper crafting.

ABOUT THE KIT

Name: Change Is Beautiful

This kit includes:

  • Change is Beautiful Photopolymer Stamp Set
  • Melon Mambo Classic Stampin’ Spot®
  • Printed card bases
  • Printed envelopes
  • Printed, shaped die cuts
  • Iridescent sea glass
  • Dimensionals

Card size: 4-1/4″ x 5-1/2″ (10.8 x 14 cm)

Coordinating Stampin’ Up! colors: Balmy Blue, Basic Black, Bermuda Bay, Crushed Curry, Evening Evergreen, Granny Apple Green, Melon Mambo.

Subscribe to the April Paper Pumpkin Kit between 11 March and 10 April here.


Stampin’ Up! Products Use in Creating This Card

 Card Cuts

  • Basic White card stock
    • card base — 4-1/4″ x 11″ scored at 5-1/2″
    • art panel — 2-1/8″ x 3-1/2″
    • ornate panel — 2″ x 5-1/2″
    • inside panel — 4″ x 5-1/4″
  • Poppy Parade card stock
    • background panel — 4″ x 5-1/4″
    • inside strip — 1-1/4″ x 5-1/4″
  • Flowering Tulips DSP
    • mat on card front — 2″ x 5-1/8″
    • inside — 1-1/2″ x 5″